Libertà vo cercando, ch'è sì cara, come sa chi per lei vita rifiuta

Categoria: security

Implementing continuous SBOM analysis

  1. From-cves-scanners-to-sbom-generation
  2. You are here!
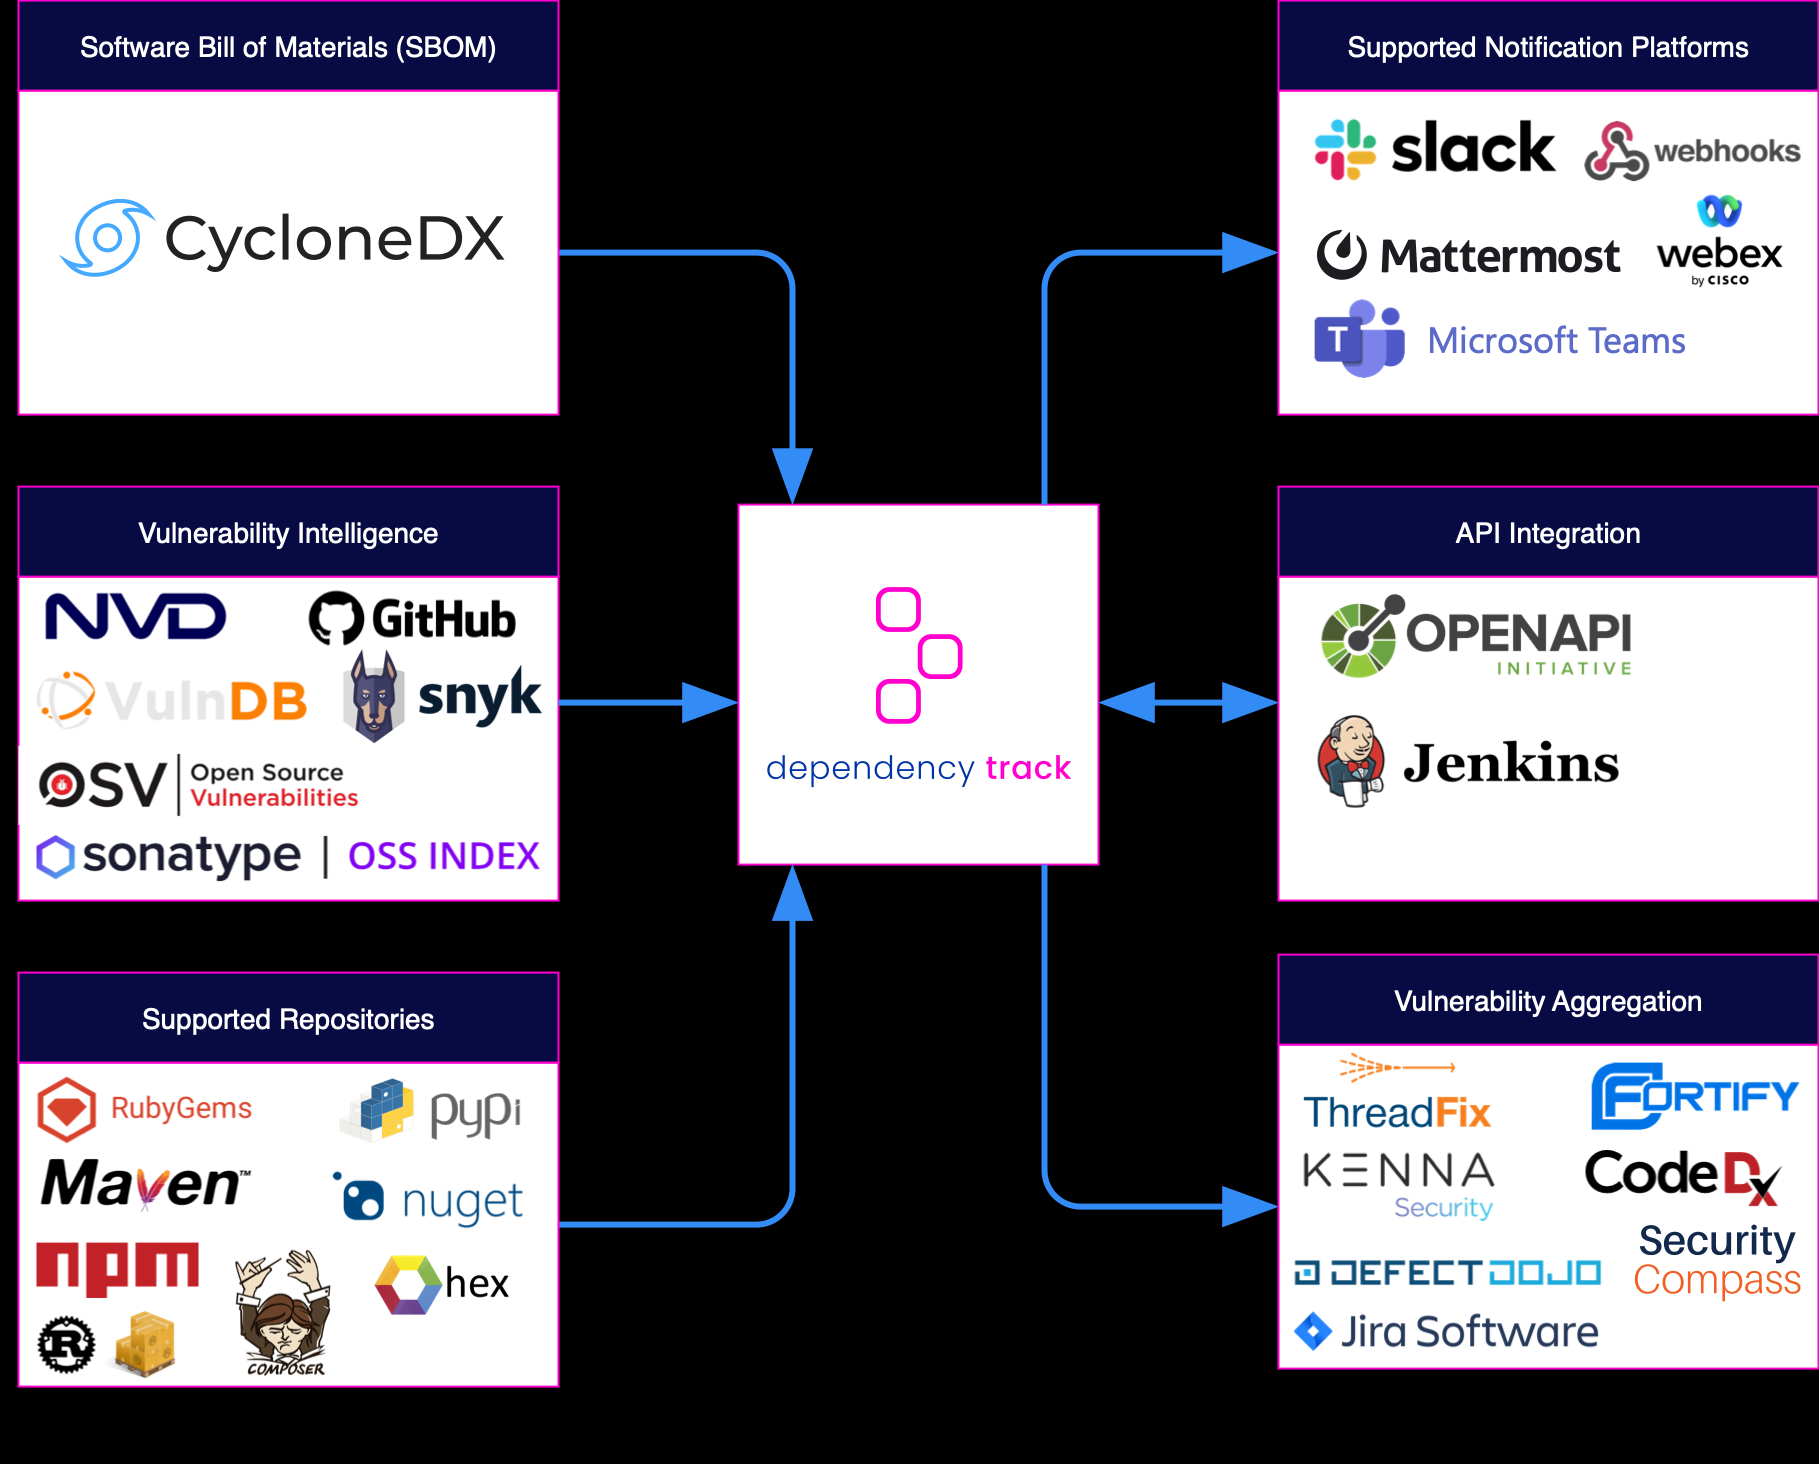
  3. Dependency Track – To come!

After the deep theoretical dive of the previous article let’s try to translate all that jazz in some real example and practical use cases for implementing a continuous SBOM file generation.

Verse 1)
Grype and Syft, two brothers, so true
In the world of tech, they’re both making their due
One’s all about security, keeping us safe
The other’s about privacy, a noble crusade

(Chorus)
Together they stand, with a mission in hand
To make the digital world a better place, you understand
Grype and Syft, two brothers, so bright
Working side by side, to make the world’s tech just right

(Verse 2)
Grype’s the strong one, he’s got all the might
He’ll protect your data, day and night
Syft’s got the brains, he’s always so smart
He’ll keep your secrets, close to your heart

(Chorus)

ChatGPT

[Azure pipelines] Grype + Syft

Following there is a working example of a sample Azure pipeline comprehending two templates for having a vulnerabilities scanner job and a parallel SBOM generation.

The first job will leverage Grype, a known open-source project by Anchore, while for the second one we will use its brother/sister Syft.

At the beginning what we do is to make sure this become a continuous scanning by selecting pushes on master as a trigger action, for example to have it start after each merge on a completed pull request.

You can specify the full name of the branch (for example, master) or a wildcard (for example, releases/*). See Wildcards for information on the wildcard syntax. For more complex triggers that use exclude or batch, check the full syntax on Microsoft documentation.

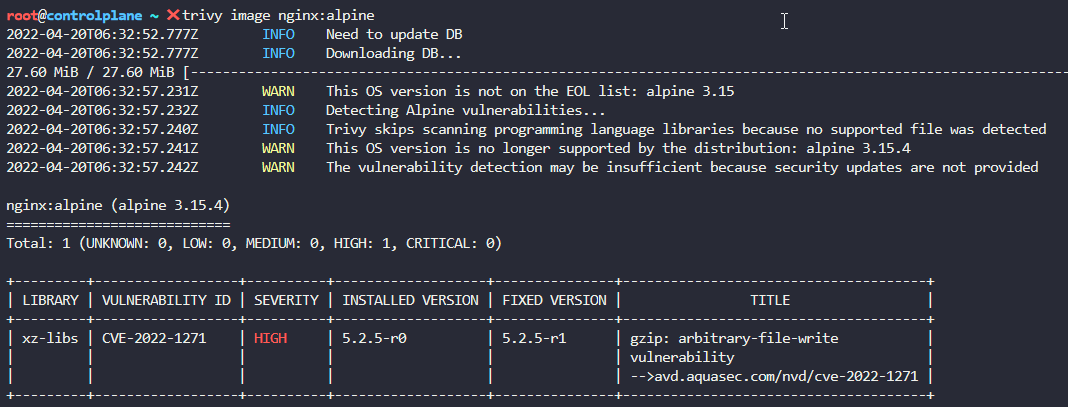
In the Grype template we will

  • download the latest binary from the public project
  • set the needed permissions to read and execute the binary
  • check if there is a grype.yaml with some extra configurations
  • run the vulnerability scanner on the given image. The Grype databse will be updated before each scan
  • save the results in a file “output_grype”
  • use the output_grype to check if there are alerts that are at least High, if so we want also a Warning to be raised in our Azure DevOps web interface.

In the Syft template we will have a similar list of parameter, with the addition of the SBOM file format (json, text, cyclonedx-xml, cyclonedx-json, and much more).

After scanning our image for all its components we then publish the artifact in our pipeline, since probably we’ll want to pull this list from a SBOM analysis tool (i.e: OWASP Dependency-Track, see previous article).

Go to the code below. |🆗tested code |

Github Actions

In GitHub it would be even easier since Syft is offered as a service by an Anchore action.

By default, this action will execute a Syft scan in the workspace directory and upload a workflow artifact SBOM in SPDX format. It will also detect if being run during a GitHub release and upload the SBOM as a release asset.

A sample would be something like this:

name: Generate and Publish SBOM

on:
  push:
    branches:
      - main

env:
  DOCKER_IMAGE: <your-docker-image-name>
  ANCHORE_API_KEY: ${{ secrets.ANCHORE_API_KEY }}
  SBOM_ANALYSIS_TOOL_API_KEY: ${{ secrets.SBOM_ANALYSIS_TOOL_API_KEY }}

jobs:
  generate_sbom:
    runs-on: ubuntu-20.04

    steps:
    - name: Checkout code
      uses: actions/checkout@v2

    - name: Generate SBOM using Anchore SBOM Action
      uses: anchore/actions/generate-sbom@v1
      with:
        image_reference: ${{ env.DOCKER_IMAGE }}
        api_key: ${{ env.ANCHORE_API_KEY }}

    - name: Publish SBOM
      uses: actions/upload-artifact@v2
      with:
        name: sbom.json
        path: anchore_sbom.json

Code Samples

cve-sbom-azure-pipeline.yml


You like it You click it!

From CVEs scanners to SBOM generation

Example of Software Life Cycle and Bill of Materials Assembly Line

DevOps companies have always been in a constant pursuit of making their software development process faster, efficient, and secure. In the quest for better software security, a shift is happening from using traditional vulnerability scanners to utilizing Software Bill of Materials (SBOM) generation. This article explains why devops companies are making the switch and how SBOM generation provides better security for their software.

A CVE is known to all, it’s a security flaw call
It’s a number assigned, to an exposure we’ve spied
It helps track and prevent, any cyber threats that might hide!

Vulnerability scanners are software tools that identify security flaws and vulnerabilities in the code, systems, and applications. They have been used for many years to secure software and have proven to be effective. However, the increasing complexity of software systems, the speed of software development, and the need for real-time security data have exposed the limitations of traditional vulnerability scanners.

Executive Order 14028

Executive Order 14028, signed by President Biden on January 26, 2021, aims to improve the cybersecurity of federal networks and critical infrastructure by strengthening software supply chain security. The order requires federal agencies to adopt measures to ensure the security of software throughout its entire lifecycle, from development to deployment and maintenance.

NIST consulted with the National Security Agency (NSA), Office of Management and Budget (OMB), Cybersecurity & Infrastructure Security Agency (CISA), and the Director of National Intelligence (DNI) and then defined “critical software” by June 26, 2021.  

Such guidance shall include standards, procedures, or criteria regarding providing a purchaser a Software Bill of Materials (SBOM) for each product directly or by publishing it on a public website.

Object Model

CycloneDX Object Model Swimlane
SBOM Object Model

SBOM generation is a newer approach to software security that provides a comprehensive view of the components and dependencies that make up a software system. SBOMs allow devops companies to see the full picture of their software and understand all the components, including open-source libraries and dependencies, that are used in their software development process. This information is critical for devops companies to have, as it allows them to stay on top of security vulnerabilities and take the necessary measures to keep their software secure.

The main advantage of SBOM generation over vulnerability scanners is that SBOMs provide a real-time view of software components and dependencies, while vulnerability scanners only provide information about known vulnerabilities.

One practical example of a SBOM generation tool is Trivy, an open-source vulnerability scanner for container images and runtime environments. It detects vulnerabilities in real-time and integrates with the CI/CD pipeline, making it an effective tool for devops companies.

Another example is Anchore Grype, a cloud-based SBOM generation tool that provides real-time visibility into software components and dependencies, making it easier for devops companies to stay on top of security vulnerabilities.

OWASP Dependency-Track integrations

Finally, Dependency Track is another great tool by OWASP that allows organizations to identify and reduce risk in the software supply chain.
The Open Web Application Security Project® (OWASP) is a nonprofit foundation that works to improve the security of software through community-led open-source software projects.

The main features of Dependency Track include:

  1. Continuous component tracking: Dependency Track tracks changes to software components and dependencies in real-time, ensuring up-to-date security information.
  2. Vulnerability Management: The tool integrates with leading vulnerability databases, including the National Vulnerability Database (NVD), to provide accurate and up-to-date information on known vulnerabilities.
  3. Policy enforcement: Dependency Track enables organizations to create custom policies to enforce specific security requirements and automate the enforcement of these policies.
  4. Component Intelligence: The tool provides detailed information on components and dependencies, including licenses, licenses and age, and other relevant information.
  5. Integration with DevOps tools: Dependency Track integrates with popular DevOps tools, such as Jenkins and GitHub, to provide a seamless experience for devops teams.
  6. Reporting and Dashboards: Dependency Track provides customizable reports and dashboards to help organizations visualize their software components and dependencies, and identify potential security risks.

References

CKS Challenge #1

Here we’re going to see together how to solve a bugged Kubernetes architecture, thanks to a nice KodeKloud challenge, where:

  1. The persistent volume claim can’t be bound to the persistent volume
  2. Load the ‘AppArmor` profile called ‘custom-nginx’ and ensure it is enforced.
  3. The deployment alpha-xyz use an insecure image and needs to mount the ‘data volume’.
  4. ‘alpha-svc’ should be exposed on ‘port: 80’ and ‘targetPort: 80’ as ClusterIP
  5. Create a NetworkPolicy called ‘restrict-inbound’ in the ‘alpha’ namespace. Policy Type = ‘Ingress’. Inbound access only allowed from the pod called ‘middleware’ with label ‘app=middleware’. Inbound access only allowed to TCP port 80 on pods matching the policy
  6. ‘external’ pod should NOT be able to connect to ‘alpha-svc’ on port 80


1 Persistent Volume Claim

So first of all we notice the PVC is there but is pending, so let’s look into it

One of the first differences we notice is the kind of access which is ReadWriteOnce on the PVC while ReadWriteMany on the PV.

Also we want to check if that storage is present on the cluster.

Let’s fix that creating a local-storage resource:

Get the PVC YAML, delete the extra lines and modify access mode:

apiVersion: v1
kind: PersistentVolumeClaim
metadata:
  finalizers:
  - kubernetes.io/pvc-protection
  name: alpha-pvc
  namespace: alpha
spec:
  accessModes:
  - ReadWriteMany
  resources:
    requests:
      storage: 1Gi
  storageClassName: local-storage
  volumeMode: Filesystem

Now the PVC is “waiting for first consumer”.. so let’s move to deployment fixing 🙂

https://kubernetes.io/docs/concepts/storage/persistent-volumes/#persistentvolumeclaims

https://kubernetes.io/docs/concepts/storage/storage-classes/#local


2 App Armor

Before fixing the deployment we need to load the App Armor profile, otherwise the pod won’t start.

To do this we move our profile inside /etc/app-arrmor.d and enable it enforced


3 DEPLOYMENT

For this exercise the permitted images are: ‘nginx:alpine’, ‘bitnami/nginx’, ‘nginx:1.13’, ‘nginx:1.17’, ‘nginx:1.16’and ‘nginx:1.14’.
We use ‘trivy‘ to find the image with the least number of ‘CRITICAL’ vulnerabilities.

Let’s give it a look at what we have now

apiVersion: apps/v1
kind: Deployment
metadata:
  creationTimestamp: null
  labels:
    app: alpha-xyz
  name: alpha-xyz
  namespace: alpha
spec:
  replicas: 1
  selector:
    matchLabels:
      app: alpha-xyz
  strategy: {}
  template:
    metadata:
      creationTimestamp: null
      labels:
        app: alpha-xyz
    spec:
      containers:
      - image: ?
        name: nginx

We can start scanning all our images to see that the most secure is the alpine version

So we can now fix the deployment in two ways

  • put nginx:alpine image
  • add alpha-pvc as a volume named ‘data-volume’
  • insert the annotation for the app-armor profile created before
apiVersion: apps/v1
kind: Deployment
metadata:
  creationTimestamp: null
  labels:
    app: alpha-xyz
  name: alpha-xyz
  namespace: alpha
spec:
  replicas: 1
  selector:
    matchLabels:
      app: alpha-xyz
  strategy: {}
  template:
    metadata:
      labels:
        app: alpha-xyz
      annotations:
        container.apparmor.security.beta.kubernetes.io/nginx: localhost/custom-nginx
    spec:
      containers:
      - image: nginx:alpine
        name: nginx
        volumeMounts:
        - name: data-volume
          mountPath: /usr/share/nginx/html
      volumes:
      - name: data-volume
        persistentVolumeClaim:
          claimName: alpha-pvc
---

4 SERVICE

We can be fast on this with one line

kubectl expose deployment alpha-xyz --type=ClusterIP --name=alpha-svc --namespace=alpha --port=80 --target-port=80

5 NETWORK POLICY

Here we want to apply

  • over pods matching ‘alpha-xyz’ label
  • only for incoming (ingress) traffic
  • restrict it from pods labelled as ‘middleware’
  • over port 80
apiVersion: networking.k8s.io/v1
kind: NetworkPolicy
metadata:
  name: restrict-inbound
  namespace: alpha
spec:
  podSelector:
    matchLabels:
      app: alpha-xyz
  policyTypes:
    - Ingress
  ingress:
    - from:
        - podSelector:
            matchLabels:
              app: middleware
      ports:
        - protocol: TCP
          port: 80
        

We can test now the route is closed between the external pod and the alpha-xyz

Done!


REFERENCES:

Powered by WordPress & Theme by Anders Norén